Saturday, May 31, 2014

Shout out!

I am so excited, I got my first box from Julep yesterday. It came really fast, I think I joined at just the right time.
I was so psyched to open it. And I was not disappointed!
My Maven style profile "Bombshell". I received 2 full size nail polishes and Freedom Top Coat. and 2 small sanding blocks. It came all packaged with a 50% off coupon, a booklet telling about the different style profiles, a little welcome card that reads, "Find out who you are and do it on purpose." a quote from Dolly Parton. All packaged with scrunchy shredded paper to ensure everything was cushioned nicely.
I am very excited, and I cant wait to get my next box. They give you the opportunity to invite friends and get your next box free. The box usually runs $24.95 a month, free shipping, but you get your first box free, and you have the option of cancelling anytime you want.
So I am now officially a Julep Maven, and you can be too.
http://www.julep.com/maven.html

Friday, May 30, 2014

Shout Out Time

Hey everyone today I want to give a big shout out to Sally's beauty supply and a product they carry called Ibd 5 second brush on gel resin. This product is very low priced at around $3.50. The bottle is very small but you don't need much.
I discovered this product because even though I do my own Nail Art I don't do my own nails because I'm just learning and my daughter wanted a set of nails. I found that if I glued on the nail tips and apply several coats of this product, allowing 10~15 minutes drying time between coats (I learned this the hard way) you can build up a nice beautiful nail. I decided to do my toes first and opted to put a white tip on the big toe and paint the white on to the others. I wanted to make sure I knew how to do it correctly before using it on my daughter. I love the way my big toe came out. I did my daughter's nails and they came out beautiful. The process is fairly simple. Glue on the tip of your choice, use a polar block to lightly sand over the edge that is glued to nail bed, shape the nail as desired, clean off dust particles, brush gel resin onto each nail, dry 10 minutes or so, repeat coats of gel resin until you have 3 to 4, drying thoroughly between each. Use your polar block to lightly sand over each entire nail. Top with favorite top coat.
I topped my toe off with some little flowers and sealed it with UV gel.
A few warnings: Fumes, this stuff is strong, don't breathe in the fumes. If you plan to go swimming for several hours, wait til you get home to do a set of nails, (Also learned this the hard way).
All in all, I'm very happy with this product and plan to keep using it.

Thursday, May 29, 2014

So I'm back with a nail art tutorial. I wanted to create something pretty in green for church this coming Sunday. Our music director aka the Pastor's wife chooses colors and all of the choir and praise and worship team wear that color. So green is typically not a favorite color of mine and I definitely didn't want a solid green nail or anything like that. So I decided to opt for a bit of green, not too much. So here goes.
Materials needed: Scrap paper to make clean up easier
                             Acrylic paints (I use Oumaxi) in green and white
                             A fan brush
                             A very small lining brush
                             Tiny beads (micro beads or caviar beads) in gold
                              UV gel top coat
                              UV gel curing lamp
                               Polar block (white sanding block)
                               Dotting tool
                               Nail glue
Okay so I just got my nails done. I don't do them myself because #1 I'm just learning and #2 I'm so not able to use my left hand to do my right hand. Um, yeah! So I have a French tip in white. This leaves me with endless possibilities in my nail art.

So the Oumaxi paints come in a variety of colors and I have a set of basic colors. They were not too expensive and I got mine on ebay. So I use the dark green and the lighter brighter green and white.
I slightly sanded off the UV gel topcoat that I had on my nails when I left the salon using a polar block. Make sure your nails is clean and you dust it free of particles. I then use a dehydrator. I used the fan brush to brush a bit of dark green to each nail tip.
I then using the same fan brush lightly brush a bit of brighter green on top of that. This paint dries fairly quickly especially using such a light coat. Then taking the white and a very tiny lining brush I draw little scroll designs all over the green tip. There is no perfect way to do this. and because I have kind of a shaky hand when I've had too much caffeine mine aren't perfect by any means. Fill the area with big ones or small ones or a mix of both.

Once this is done using the dotting tool get a bit of glue and put a bit inside of one of your little scrolls, anywhere on the nail is fine. Using the same dotting tool dot it into your glue, into the beads and then place them on the nail where you've placed the dot of glue inside of one of your scrolls. Don't get too much glue on your dotting tool, not only will you pick up way too many beads you will also find that the beads will bleed color onto your design.
                             

Once you have done each nail or as many nails as you want to have beads on you will want to seal your work.
Take your UV gel and drip some right onto the beads without touching them with the brush. Now carefully brush the rest of the nail with gel. Now that you have each nail sealed with UV gel cure it with your lamp.

You're done! Note: You have the option to clean up the edge where you brushed on the green but I left it.
 

Wednesday, May 21, 2014

Nail Art Tutorial Using Airbrush,  Fimo Canes and Tape

I love trying new things with my nails and they usually don't stay the same for too many days in a row.
Today I took three of my favorite methods and combined them, of course they are all my favorite so who are we kidding.

Materials needed: Airbrush with paint of your desired color
                             Skinny tape
                             Fimo canes in bow shape
                             Nail glue
                             Regular top coat
                             UV gel top coat & curing lamp

Step 1 Start with clean dry nails making sure they are free of oils and dust.
Step 2 Put your tape in place on each nail. I did one at an angle, and one straight across on the tip.

Step 3 Airbrush your favorite color on to each nail, making sure you get them covered good.  I used red. You'll want to remove the tape now and put a light coat of a clear top coat.

Step 4 After slicing your fimo canes use a drop of nail glue to place each bow at the point where your two lines meet at a point now that you have removed the tape.

Step 5 Now that you have your fimo slices glued in place top your entire nail including the fimo slice with a coat of UV gel. Try to make sure you get this smooth as it will affect the over all look of your nails. Cure your UV gel with a curing lamp. Wash the excess paint from over spray off of your fingers.
 
I love this look, I hope you will too!

Friday, May 16, 2014

Hey everyone, hope everyone is having a great week.

Today I'm going to talk about one of my favorite forms of nail art, airbrushing! I used to have my nails airbrushed at my local salon but for some reason they stopped airbrushing. So for many years I haven't had it done. Living in a small town there aren't too many salons offering this service, so I purchased my own airbrush.

There are a lot of airbrushes to choose from on the market so pick carefully if you decide to get one. I bought mine on ebay after doing a lot of comparing between different brands. The airbrush I purchased had several attachments, two hoses, cleaning tools, and a pack of primary color paints. I paid just over $100. You will want to do some comparing of your own to get what is right for you.

When you airbrush your nails you'll want to have some items on hand.
*Plenty of newspaper to lay over your work area.
*Paper towels for clean up
*Water for clean up
*Cotton balls and or q-tips and fingernail polish remover for clean up of fingers from over spray
*Paint colors of your choice
*Airbrush, parts and accessories
*Stencils if you have them
*Base coat in color of choice
*Top coat sealer

Okay so once you're ready my advice is to practice on something to get the design down you want. There are so many different ways you can make designs on your nails.
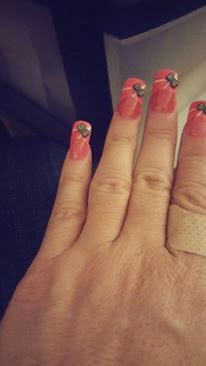
I was playing around with mine and came up with a design that I call Hunger Games. It was really easy and the pictures will be posted below.
Step 1. I sealed my nail with a clear coat.
Step 2. I sprayed the entire nail with primary yellow
Step 3. For a gradient effect I sprayed just the bottom edge with primary red
Step 4. I actually mixed red and yellow together, stirred it with a toothpick and using a stencil that resembled flames placed it at the tip of my nail and sprayed.
Voila, a Hunger Games themed fingernail.

Be creative when using your airbrush. Here are some ideas:

*Use painters tape and a decorative hole punch to create designs on your nails. Just punch a design into your tape, place the tape on your nail where you want it and spray with a color choice.
*Use lace to create a totally cool effect. Place the lace on your fingernail, spray with color choice.
*Use striping tape. Start with a base coat in color of choice and when it is completely dry place striping tape in desired positions and spray with color of choice. The possibilities are endless with this one.

The main thing I can tell you is: Shop around for the best price, if you want to own an airbrush, but make sure you get good quality equipment. Watch some tutorials on youtube if you want to know how to hook it all up (That's what I did). And practice, practice, practice. But, enjoy yourself!

Tuesday, May 13, 2014

Hey everyone today I'm going to tell you a little about nail art molds.
You can find an extensive collection of nail art molds on the market with so many different themes.
I just discovered nail art molds and I love them.

Nail Art molds are quite small and made of a silicone type substance and they are very flexible. Some of them are quite detailed. I got my first one free in a kit, it has a couple different sizes of roses on it.

If you want a mold and are having trouble finding exactly what you want you might think of making your own. Using molding putty the options are limitless. You can find several brands of molding putty in your craft or hobby store. The putty comes in two parts. Mix equal parts of the putty together in a small ball and mix until completely blended. Form a nice round ball, flatten slightly with a flat object and press in your favorite charm, decorative button etc. Let set for just a few short minutes, flex the mold to pop out your charm and its ready to go.

Nail Art molds can be used with gel or acrylic. If using acrylic you will need all the supplies you would normally use as if you were about to create a set of nails. I recommend using colored acrylic powder so you will not have to paint your creations. Once you have dipped your brush in the liquid and then the powder, pack your bead of acrylic into the mold, making sure to fill it completely, tapping the mold slightly so you don't have air bubbles. The process for filling the mold with gel is the same except there is no liquid involved and you are just scooping the gel up with your brush. Let your acrylic or gel set for a few minutes before removing your creation. I use the edge of a clay carving tool to assist me in lifting my creation out of the mold. An acrylic one will need the edges cleaned up slightly with a light sanding with your finger nail file. A gel creation will have a sticky residue that will need to be removed.

I attach my creations with a little nail glue and usually seal them further by using a UV gel top coat which is then cured with my UV gel curing lamp.

You'll want to keep in mind the size of your nails when creating nail art mold


s. Not all acrylic or gel creations fit on every nail.

I hope you will try your hand at creating some beautiful 3d art for your nails.

Monday, May 12, 2014

I started having my nails done in a professional nail salon 27 years ago. Sometimes it took them so long I had to come back a second day just so they could finish. 
 In those days the nails shattered so easily and I went back on a regular basis for repairs. 
Boy how things have changed. Today I'm in and out in under an hour.
I love nail art so much and usually apply my own decorations to my nails. From fimo slices and studs, to paint/polish pens and airbrushing, I love it all.
My hope is to learn enough so I can save money by doing my own acrylic nails. 
I also hope to take courses and make a little money doing other people's nails.
As I learn more about nail art I will share my discoveries with you.